1 “A Perfect Day” Project Overview
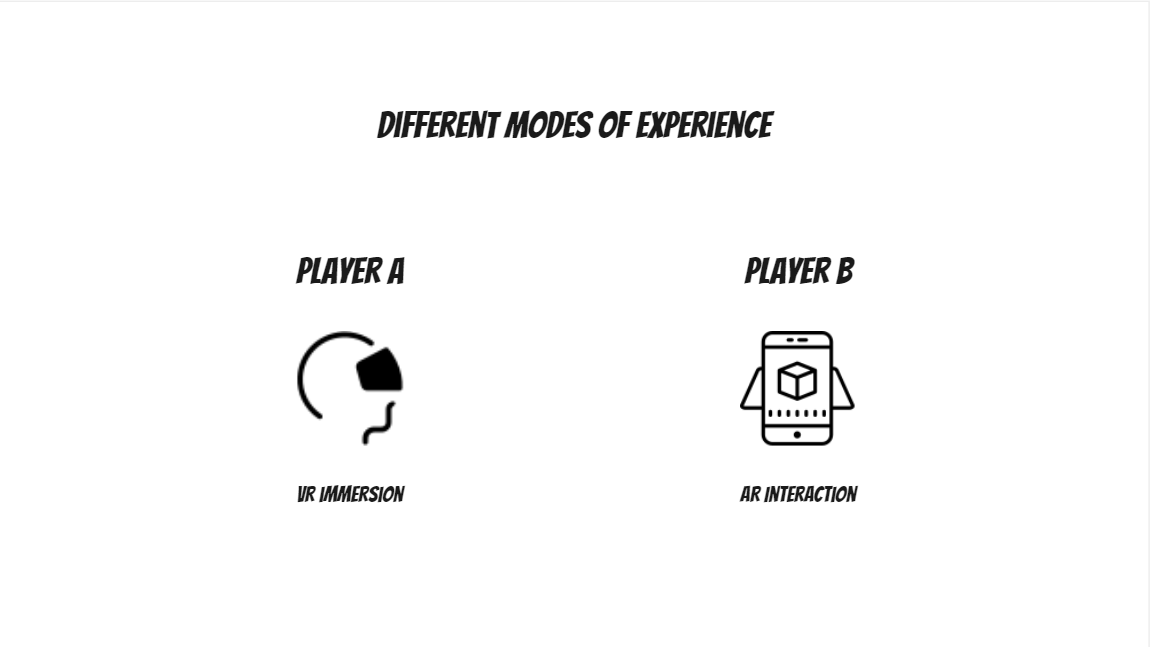
“A Perfect Day” is a multiplayer mixed reality experience. This experience looks at the relationship between human and AI in the context of domestic living space and invite participants to rethink the connection between human intelligence and artificial intelligence.
I am collaborating with Lisa Xiao on this year’s project. We have identified the core technical investigation in this project would be:
VR
Multiplayer communication
How do we make two player’s experience in sync when one of them in virtual space and one of them in analogue space?
Optimisation
How to optimize VR contents to prevent lagging and motion sickness?
AR
Hand Tracking and Passthrough
How to utilize the AR feature of the quest 3 and realize it in UE?
Analogue/virtual communication
How to connect virtual space to analogue installation in terms of locations and actions?

2 Reference “Who’s Lila”
"Who is Lila?" is a game that has gained a lot of attention for its unique gameplay and storytelling approach. The game was released in 2022. It's categorized under several genres, including horror, detective, and interactive fiction, and is known for its puzzle, exploration, and point & click elements. The game's most notable feature is its facial expression mechanic. Players control their character's facial expressions instead of choosing dialogue options. This element is more than a gimmick; it's integral to the gameplay and story, as different expressions can unlock various dialogue paths and endings. The game makes the player feel like they are shaping the narrative through these expressions, adding to the overall eerie and immersive experience. This innovation challenges conventional game design and player interaction, offering a fresh perspective on narrative unfolding in games.
"Who is Lila?" is often compared to works by David Lynch, known for its surrealist and psychological horror elements. The game delves into the anxieties and horrors of social interactions, exploring themes like reliance on facial expressions in social interactions and the performance of being human. It also draws inspiration from Jorge Luis Borges' "The Garden of Forking Paths," a pioneering work in the realm of hypertextual narrative. Borges' story, known for its labyrinthine structure of multiple, branching storylines, has been influential in the development of narrative games. This influence is evident in "Who is Lila?" where the player's choices, much like the forking paths in Borges' work, lead to different outcomes and experiences. This approach reflects a deep engagement with the concept of non-linear storytelling, allowing for a rich, multi-layered narrative experience that is both complex and engaging.
However, the game also reflects certain limitations, such as the challenges in integrating novel gameplay mechanics seamlessly into narrative structure without disrupting player immersion.
There is minimal guidance provided at the start of the game on distinguishing the main plot from subplots which lead players to confusion. Players sometimes reach endings without fully understanding the main narrative. Key plot elements intended for later discovery are sometimes encountered too early, disrupting the storytelling flow. While the game aims to provide player agency, the challenge lies in balancing this with a coherent narrative.
The thing I am most inspired by this game is how to effectively give players agency in the narrative, ensuring their choices have real impact on the story's progression. This approach will encourage deeper player engagement. Additionally, I'm intrigued by the integration of real-life elements into gameplay such as navigating actual websites, linking to local drives or visiting real world locations to enhance immersion. I would try to integrate these techniques to my skills development this year.
3 Reference “Symbiosis”
Symbiosis by Polymorf is a mixed reality preformative installation. It invites audiences to enter a world 200 years in the future where extreme climate change has transformed the Earth into a ruin inhospitable for humans. where rich post-human biotypes emerge, ranging from new genetically altered life forms, (chemical) robots, hybrid technologies, and/or autonomous intelligent systems. These life forms share resources, habitats, bodies and information in a symbiotic way. This multiuser, multisensory experience explores the concept of post-humanism by allowing participants to embody the symbiotic life form. It consists of a performative space where each participant can engage in a multi-user VR experience, selecting specific symbiotic human-animal or human-technologic relationships to explore. This choice determines their character and role within the overall story world. All participants play a different symbiotic role in each other's individual lives and all characters come together at the end of the experience to join in a shared food experience.
The installation uses VR as a theatrical and philosophical tool, pushing against conventional theatrical boundaries where a fourth wall stands clearly between the audience and the performer. Within Symbiosis, the visitor is both spectator and performer, providing an unique more immersed experience.
Physically, the installation engages the body of the visitor, using it as a muscle to control a speculative virtual body. One of the key elements of "Symbiosis" is the collective eating ritual that combines virtual and real foods. The physical experience is further enhanced by uniquely designed soft robotic wearables that enable various haptic interactions and different kinds of scents released from the suits. It's hijacking VR's immersive capabilities to explore a possibility beyond pure virtual or physical, immersing all 5 senses of the audience.
The concept of "Symbiosis" is inspired by Donna Haraway's book "Staying With The Trouble" and "The Camille Stories: Children of Compost." It is a speculative exploration of how genetic, cultural, and technological traits might be exchanged between humans and other entities, affecting future coexistence on physical, emotional, and spiritual levels, and raise questions to current humanistic, anthropocentric beliefs. Such incorporation of a collective embodied experience engages them on both physical and mental level, successfully makes the philosophical exploration more tangible for the participants.
In conclusion, "Symbiosis" stands as an innovative foray into using VR for deep philosophical exploration, challenging the boundaries of human experience and perception in a technologically mediated world. I am fascinated by the possibility of mixed reality helps the participants to embody another entity and form a better understanding of non-human beings. I would like to explore possible ways for humans to embody an AI in my work.
4 Pipeline
The pipeline for this project are set out as follow.
Because this is an MR project, we need to consider both the virtual production and the physical production. This sets challenges to the project as in what comes first and what comes next. We have made this simple workflow diagram to roughly guide our production process.
We mainly uses blender as a way to modelling, but we also needs rhino for the parts that needs to be physcially visible because it has a higher precision and is more suitable for 3d printing.
We need to test the level design at a very early stage of the project as a guidance for the asset development, the lighting is also crucial to determine where the players will pay attention to.

5 Oculus Quest/ Unreal Engine_1 Set Up
There are several steps I have gone through in order to correctly set up the connection between oculus quest 3 and unreal engine.
1. Download the Java SE Development Kit 17.0.9
While the Unreal Engine primarily uses C++ for game logic and scripting, the JDK is required for the broader Android development ecosystem, which encompasses the Oculus Quest.

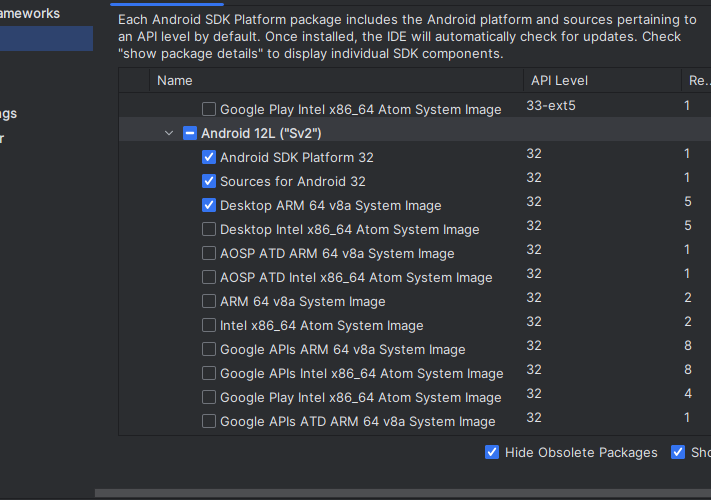
2. Android Studio Flamingo
Android Studio and its SDK components provide the foundation for develop, test, and debug Unreal Engine projects for the Oculus Quest. Ensure the development environment is equipped with the right tools and libraries.


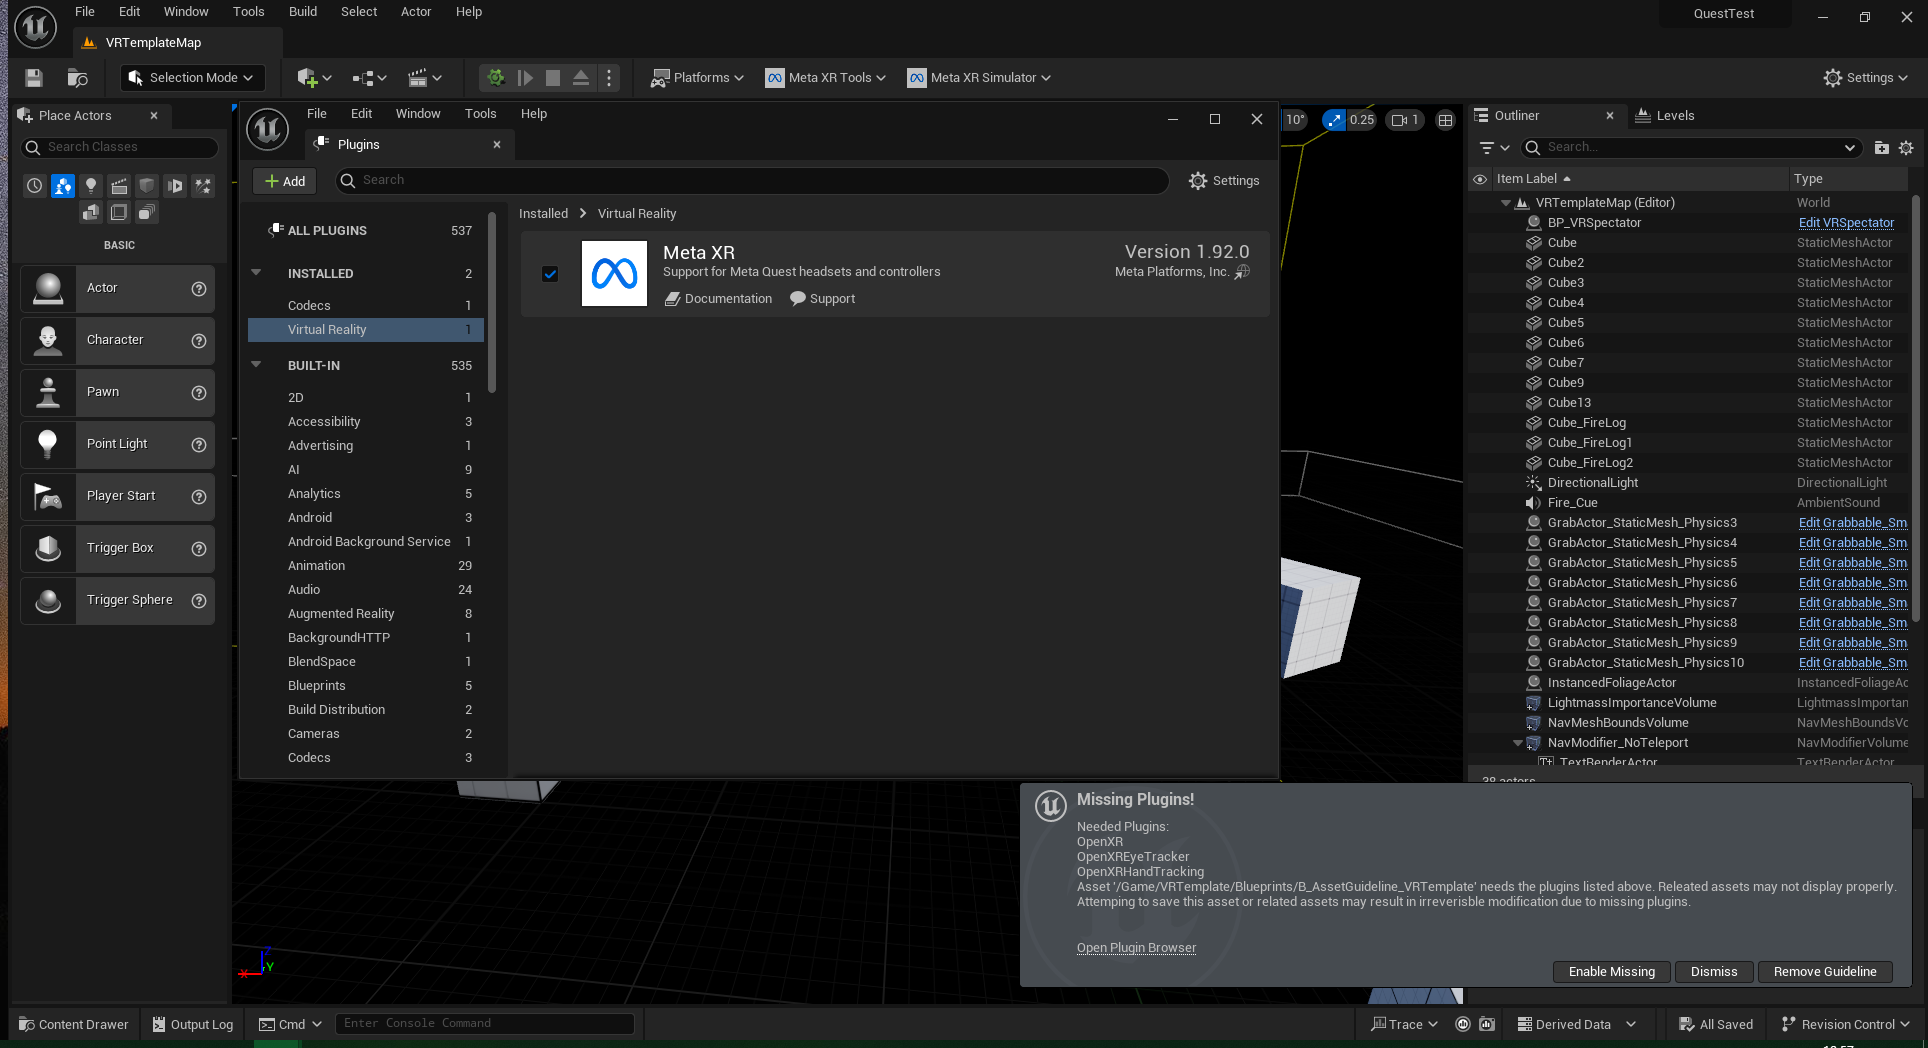
3. Meta XR plug-in
Alter some of the setting is the Meta XR plugin, to enable features like passtrhough and hand tracking.
Note that Meta XR is not compatible with openxr plug-in, sothe openxr series needs to be disabled.
Ensure the right android sdk is selected in the Platform tab.

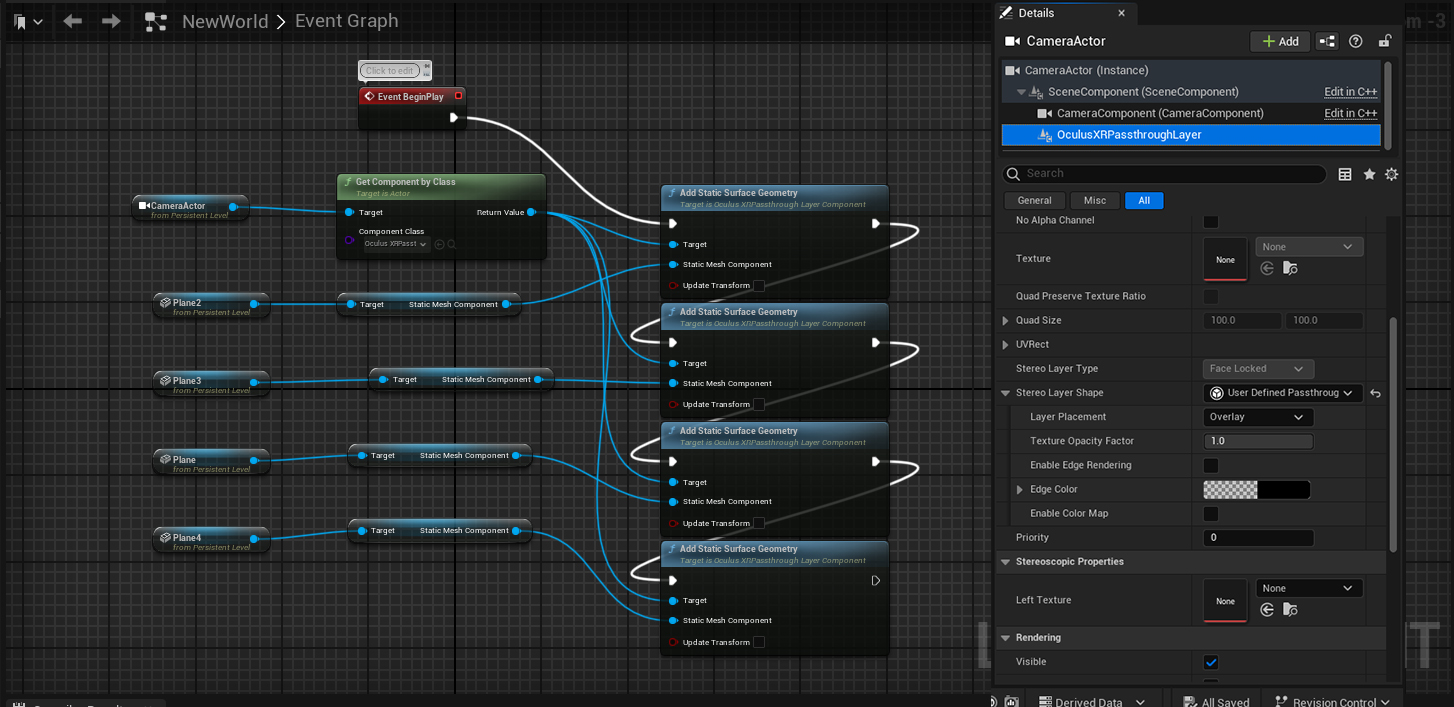
6 Passthrough
I followed the Meta developer hub’s tutorial for the passthrough effect.
The oculus passthrough is basically rendering a layer of photoscanned surrounding space. To achieve what we want, which is a portal of virtual room through a frame in reality, I create a plane in UE that covers the virtual contents behind.
This plane is referenced in level blueprint and determined as a static surface in which the passthrough layer is projected on.
In order to have the passthrough layer shown on 360degree underlaying the scene, I added another passthrough component in the VR pawn. This passthrough component has reconstructed instead of user determined in stereo layer shape and is set to underlay.


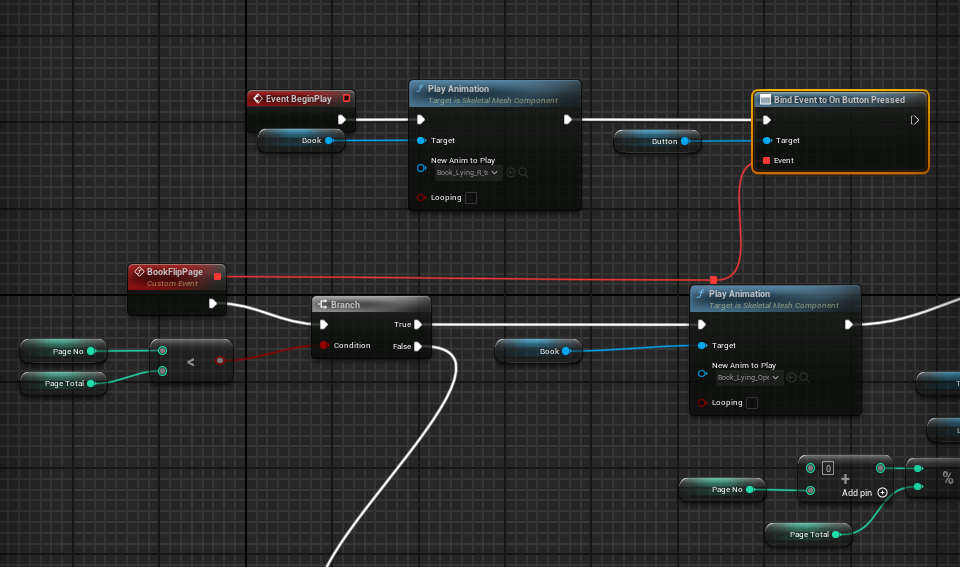
7 Hand Tracking
Oculus provide a built-in feature to detect hands with Meta Quest3 on Unreal Engine. To enable it, I need to turn off the openxr plugin because it is not compatible with the META XR plugin.

As shown on meta developers hub, Oculus Input is the main source of input data for Unreal Engine. Oculus Input routes hand input through the Unreal Engine input system the same way that controller buttons and sticks are. Pinches and pinch strength are also routed as hand input.
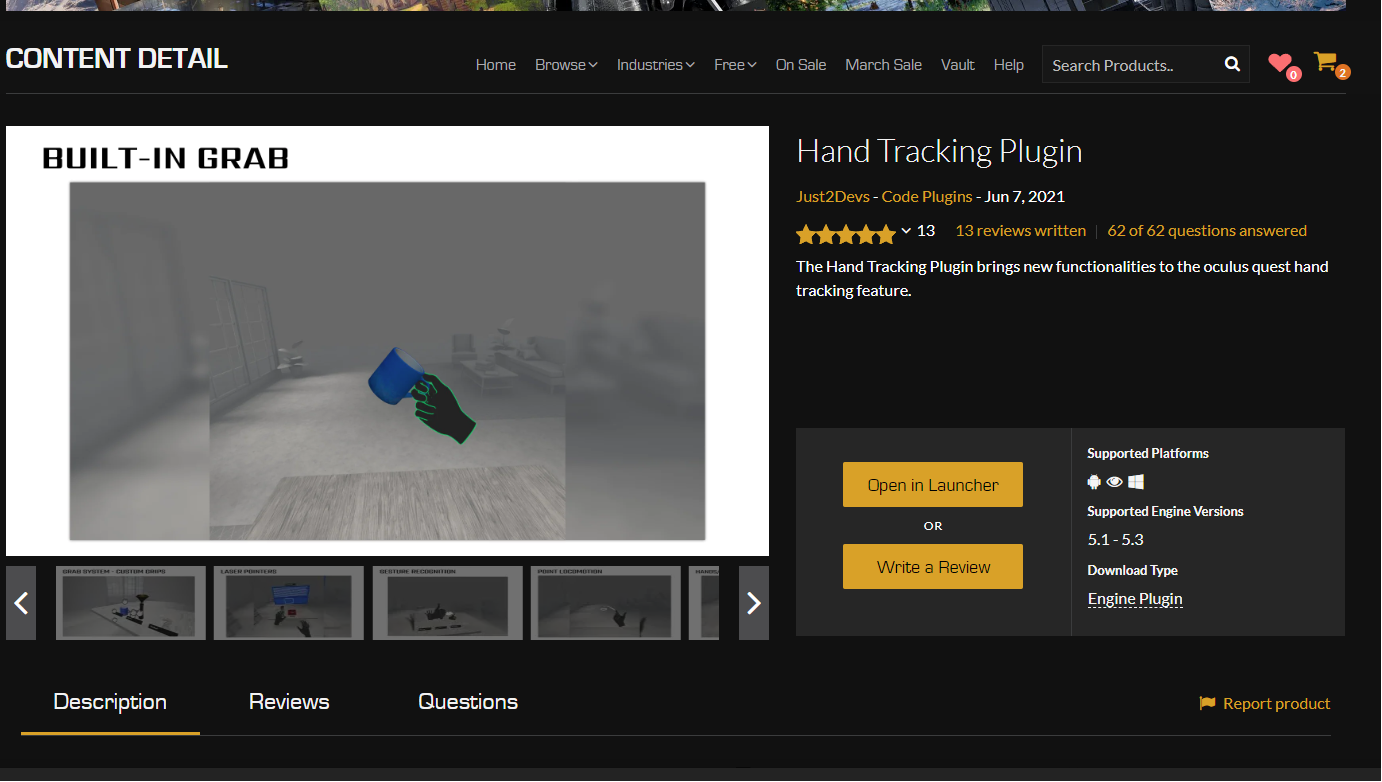
However it still need developers to configure the collision and gestures for the hands detected in order to utilize the hands to interact with virtual objects. I used the Hand Tracking Plugin developed by Just2Devs who provides built in features including gestures, grabs, laser pointers and locomotions, which made the hand tracking a lot easier. In our experience I used the button module, which automatically detect the collsion of the hand with the button and fire event on button pressed.


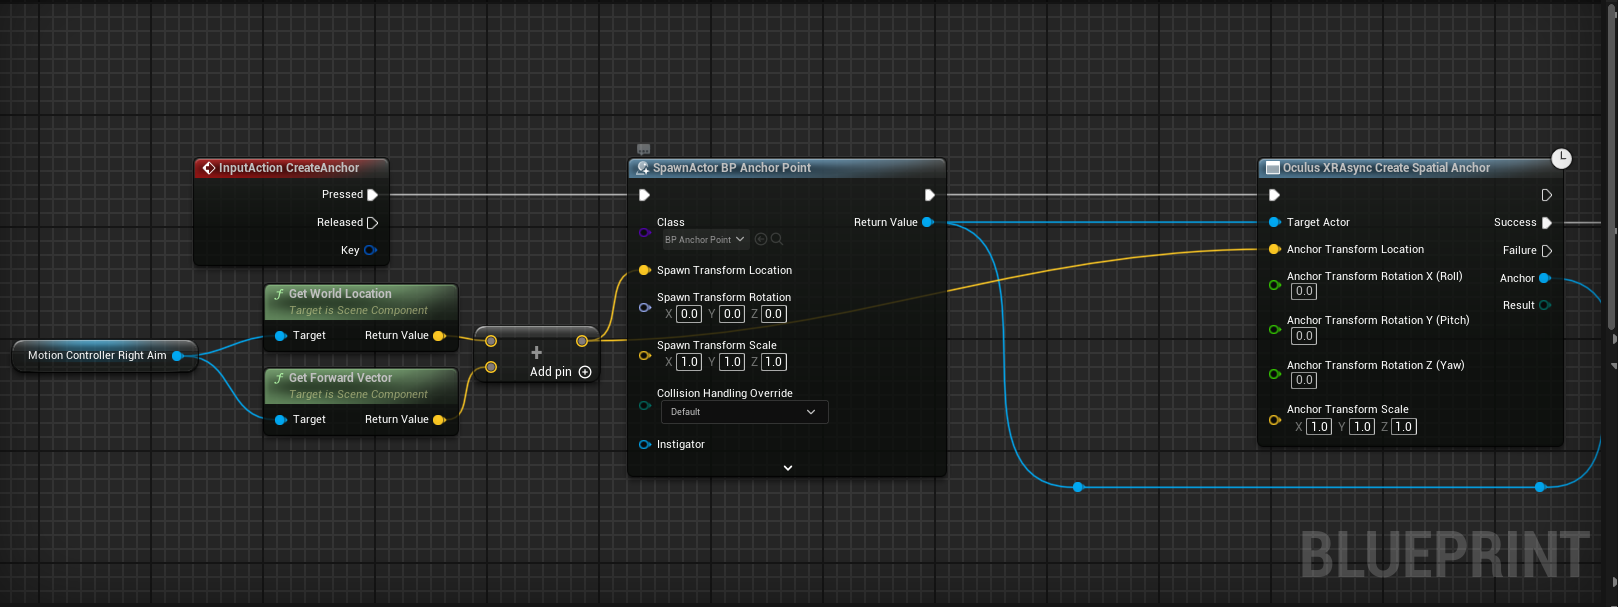
8 Spatial Anchor
Spatial Anchor is often used to share location between multiplayers especially when they are in AR, so they can see the same thing at the same place.
In our project however, because there’s only one player in AR, we only want to use spatial anchor to determine where the virtual map spawns, so that the virtual contents overlap with the physical triggering object. To do so, I create the spatial anchor blueprint, but instead of storing the anchor, I simply stream the level of the virtual map when the player determines an anchor.
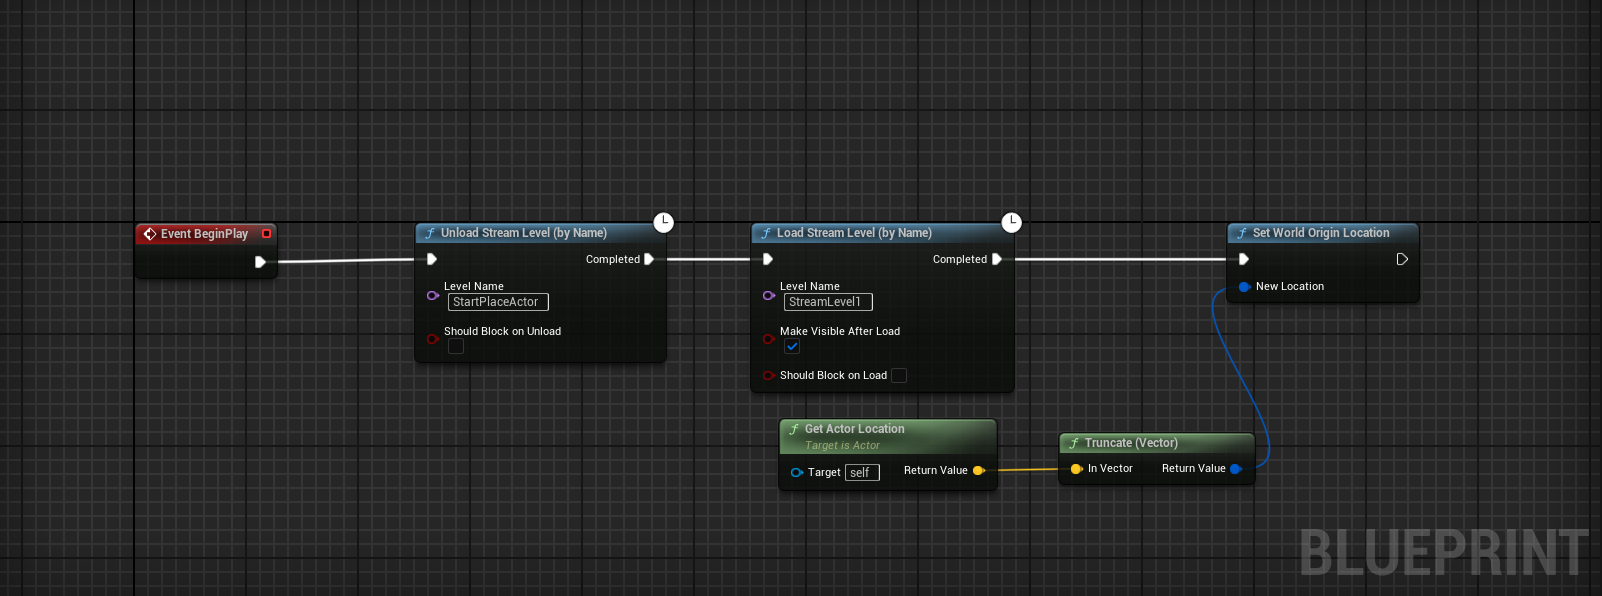
Storing spatial anchor

Streaming level using spatial anchor
9 Two player communication
We want the two player to both have the agency to trigger events. When an event is triggered by one person, the same event will be simultaneously triggered for the other player.
We achive this effect by using the UDP, or User Datagram Protocol. It is a communication protocol used across the internet for especially time-sensitive transmissions such as video playbacks or real-time gaming, where dropping some packets is preferable to waiting for delayed data. Because we are generally sending data to trigger animations, we decided to use this method.
Note that when using UDP, data is sent as packets from one host to another, but there is no guarantee that the packets will arrive in order, arrive only once, or even arrive at all. This is because UDP does not establish a connection before sending data, does not check for errors in transmission, and does not confirm that packets have been received.


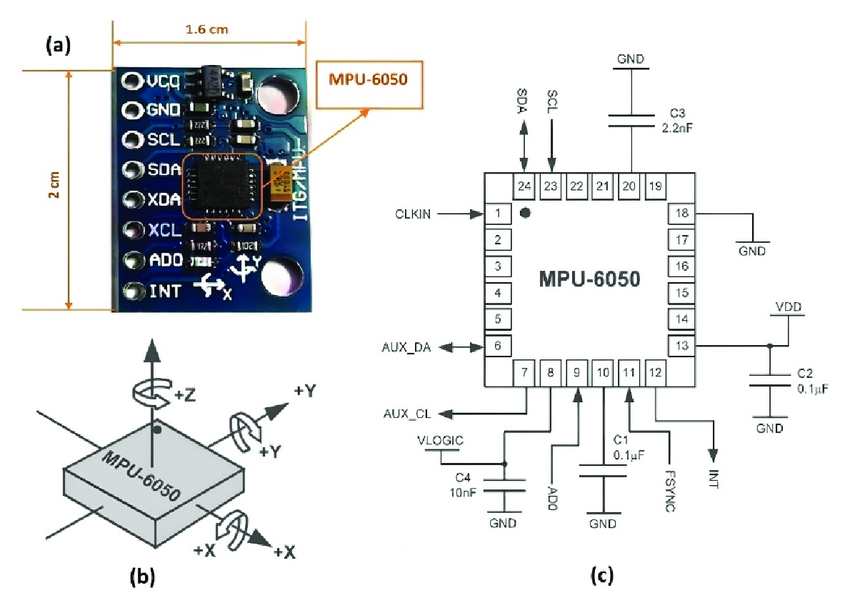
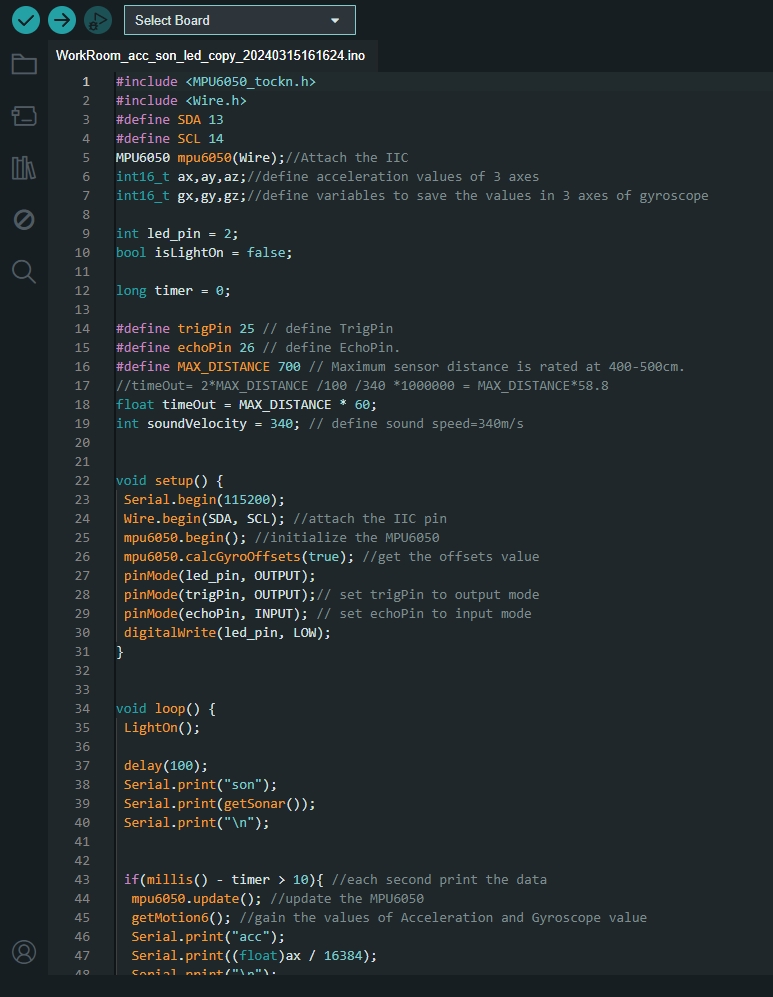
10 Arduino_1 Accelerometer
In the previous prototype of mixed reality experinece that we did last semester, we used vive and vive trackers as a way to locate objects and sync physical action to virtual action. This time, we are working with oculus quest, therefore the viev trackers is not compatible. We chose to use arduino as the medium to communicate between physical and virtual realm.
The module we selected is ESP32 as the mother board because it has a dual-core CPU, clocked at up to 240 MHz and is integrated Wi-Fi and Bluetooth, it also has a low-power consumption modes for battery-powered applications.
In terms of the triggering components, we mainly looked the following for tracking motion:
BNO055
- 9-axis absolute orientation sensor, combining accelerometer, gyroscope, and magnetometer
- 6-axis motion tracking device that contains a 3-axis gyroscope and a 3-axis accelerometer.
BNO055 provides onboard sensor fusion and orientation data, whereas MPU6050 provides raw data that requires external processing. We have yet to decide whether we need an accurate replica of the motion of the physical object, so we started with MPU6050(which is much cheaper in price), just to test the connection between arduino an unreal engine first.

11 Arduino_2 Servo and Ultrasonic range
I experimented with several sensors with arduino to see if there can be some interesting combination and interations.
1 Ultrasonic
The ultrasonic ranging module uses the principle that ultrasonic waves will be sent back when encounter obstacles.The distance is measured by counting the time interval between sending and receiving of the ultrasonic waves, which is the total time of the ultrasonic wave’s journey from being transmitted to being received. The speed of sound in air is a constant v=340m/s,therefore the distance between the ultrasonic ranging module and the obstacle is calculated as s=vt/2.
I used the ultrasonic sensor to control the light intensity of a LED. The distance between 0 and 60 is mapped to the intensity of the LED.
2 Servo
Servo is a compact package which consists of a DC motor, a set of reduction gears to provide torque, a sensor
and control circuit board. Most servos only have a 180-degree range of motion via their “horn”. Servos are widely used to control motion in model cars, model airplanes, robots, etc. I want to see if I can use it to make circular motions on the physical installation.
I used a potentialmeter to control the sweeping angle of the servo. The program reads the value of the potentiometer between 0 and 1023 and convert to servo angle which is between 0 and 180.


Ultrasonic and Servo by potentiometer code
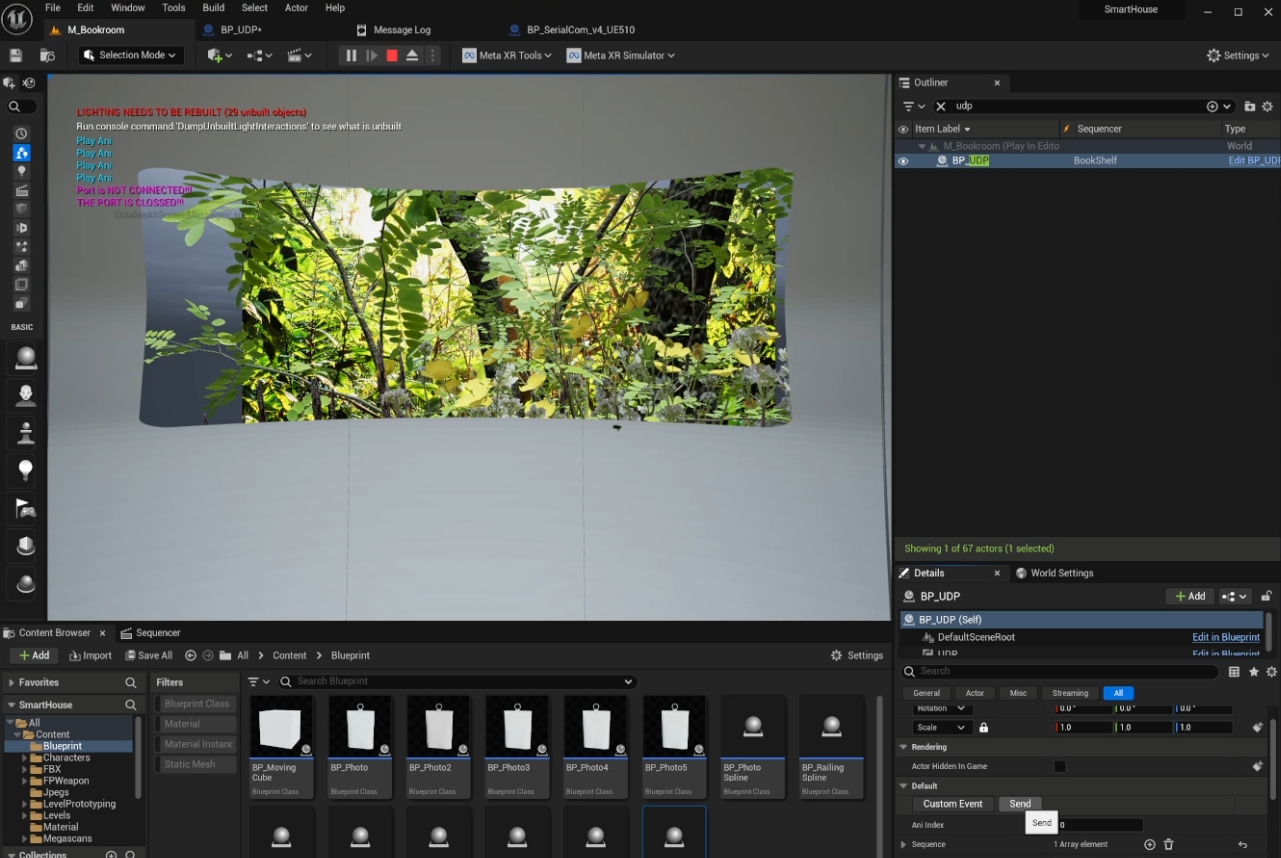
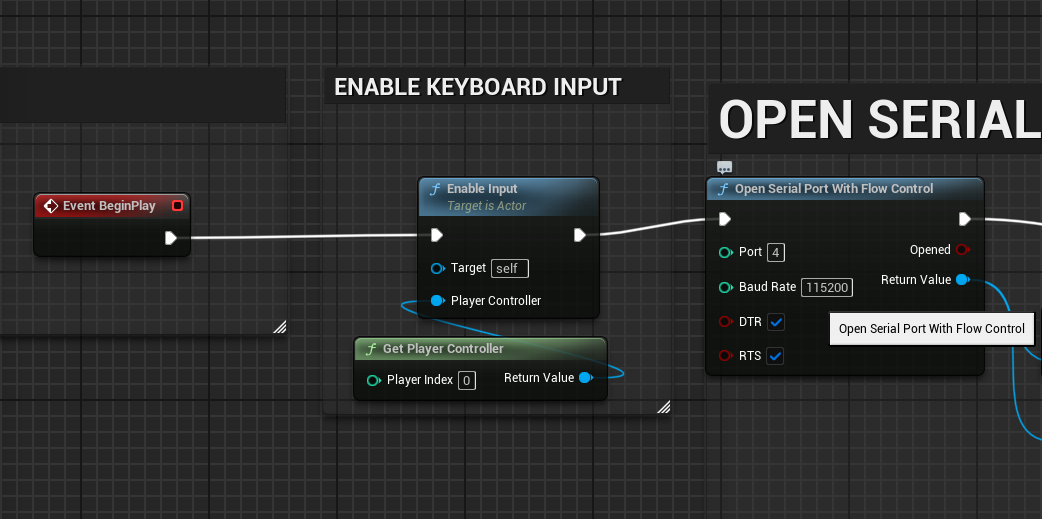
12 Arduino_2 Serial Communication
We used the Serial Communication Plugin for connecting arduino to unreal engine. It is a straight forward plugin to enable bidirectional communication between arduino and UE. The communication is carried out using serial ports, with the Arduino connected to the computer via a USB cable. The plugin handles the opening, reading from, writing to, and closing of this serial port from within Unreal Engine.

The data can be transfered by serial communication is string, integer, byte and bytes, these can then be processed in unreal or arduino IDE.
When connected, ensure the serial port number is the same shown on the arduino IDE, and choose the right baud rate for the module. Our ESP32 has a baud rate of 115200.
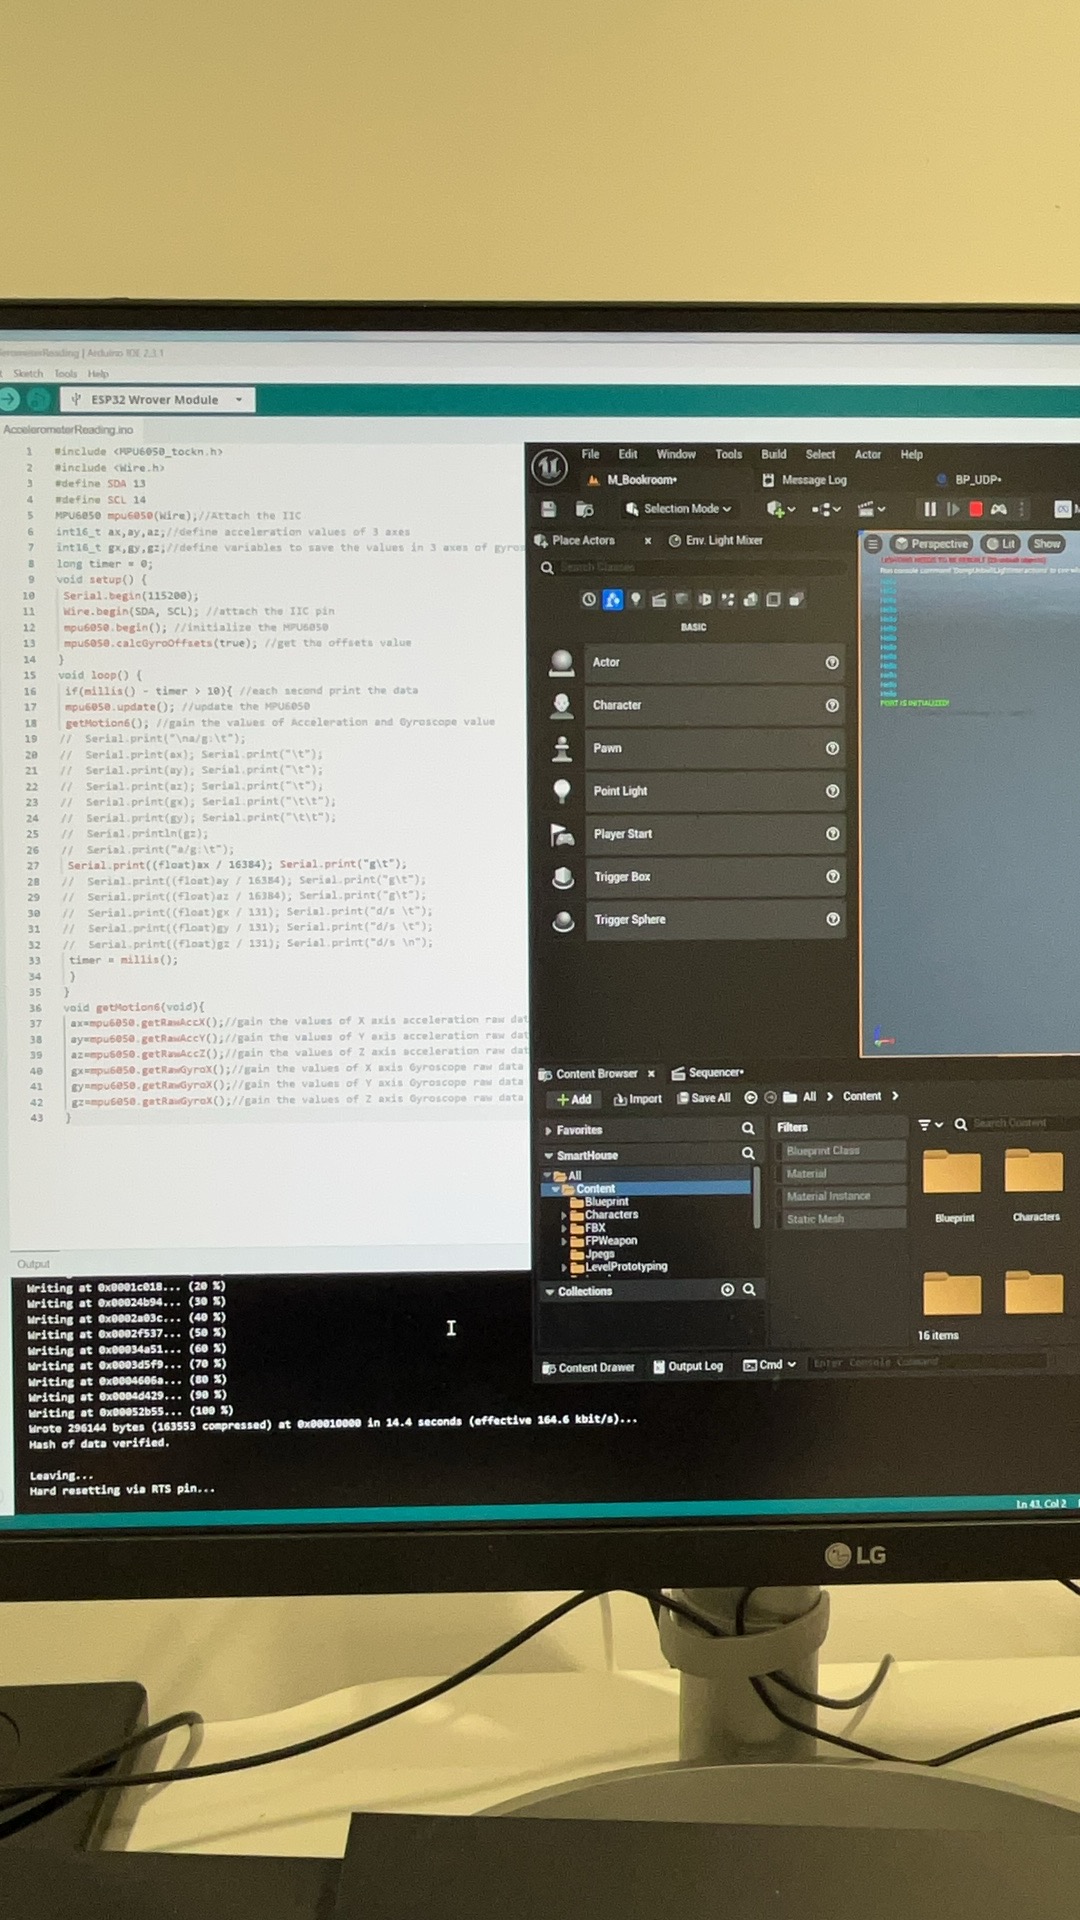

We used the MPU6050 accelerometer and tested the connection. As the serial data change goes beyond a certain threshold, we determine it as a movemtn and triggers an animation.
13 Arduino_4 UE to Arduino
We further utilized the serial communication plugin. When player A triggers something in unreal, the light in physical space will light up, telling player B to trigger the physical artefact, which altenatively triggers the virtual animation.
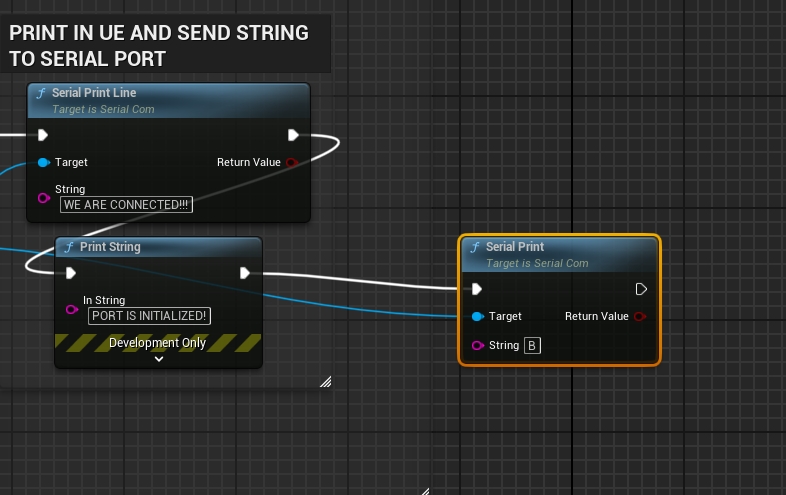
In unreal, I used the serial communication plug in to send a serial string to the arduino IDE, on the right its the code for unreal to configure the string, and toggle the led light to turn on and off.


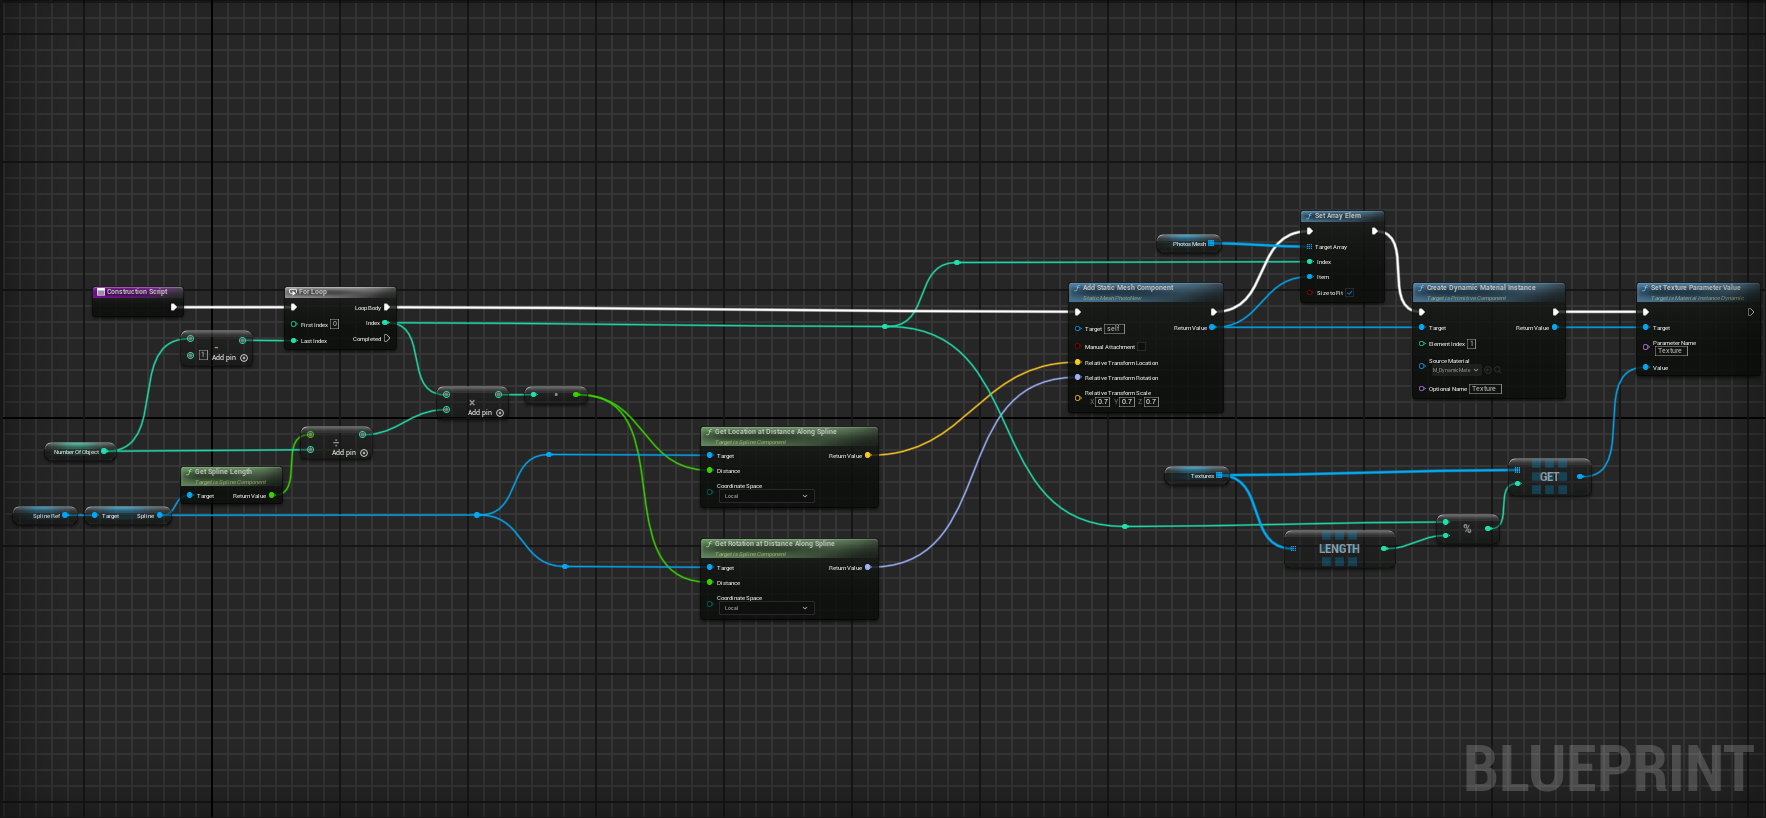
14 Unreal Spline
We use blueprint to control the object movement to move along a spline step by step when lplayer triggers.
This is achieved by spawning actors along the spline, record each of the object in an array and create dynamic material instnce for each of the objects. Then in the event graph, use a for loop to offset the objects, make an alpha animation for each transition. In order to make the movement loop, that is to make the object spawn from the starting position when it reaches the end, I used the modulo% node. When the player pressed the button, the objects moves forward by one step.


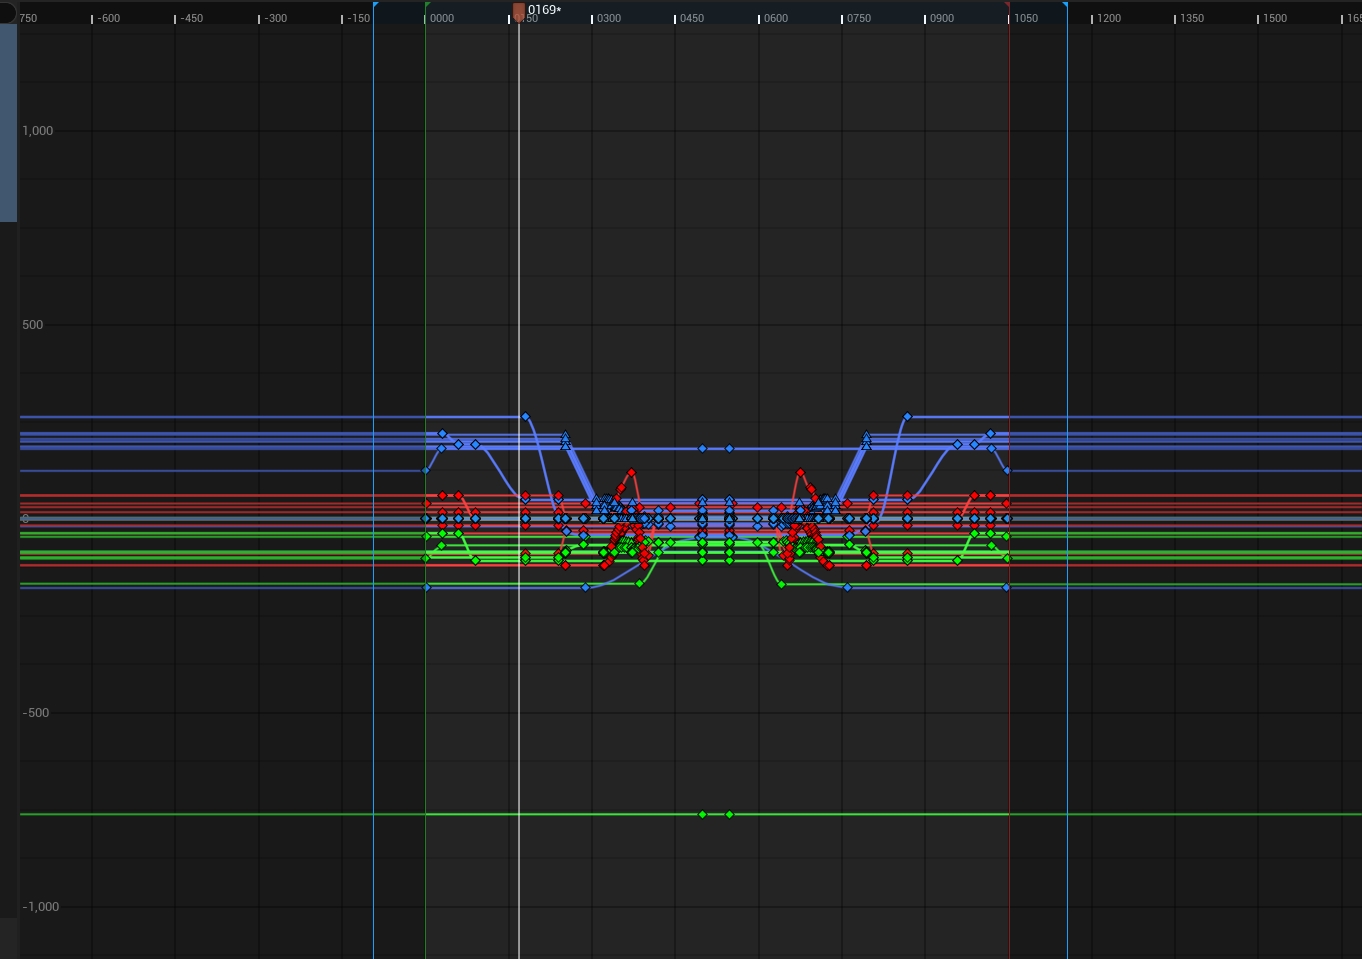
15 Animation using Level Sequence
We want our experience to be a curated interacive narration, so most of the onboarding process will be prescripted animation.
We mainly used level sequence to make the animation.

The way level sequence work is that it takes temporary control of the objects tracked in the sequence and alters the state of the object. One problem I encountered when using level sequence is that when there are multiple level sequence referencing the same object, the one played after the other will reference the ending position of the object in the previous level seqeucne instead of the original state. Even it’s the same level sequence playing forwards and than reversed, it will cause the same problem.
The solution I used is to script the same animation forwards and backwards in the same level sequence and used the “play to” node to pause in the middle.


16 Animation using Blueprint
For looping animations and animations that needs to be called at several stages in the levels, using blueprint will be a better practice.
In the light drop animation, I used a timeline to control the alpha of the position of the lights. Because there is two lights playing the animation reversely, I used an public boolean variable to determine whether the lights should go up or down in the level editor.


17 FBX Animation to UE
There are very less tutorial on how to properly import FBX animation from blender to UE. After several try outs and testing, I developed my own workflow.
0. Preparation
Before animating anything, ensure that any transformation is applied. Make sure the origin point of the object is either in the world origin, or is in desirable position to the world origin, because FBX takes the world origin as the object orgin when export into UE.
It is also recommended to apply all the modifiers.
1. Blender Animation
Select the object that needs to be animated. Go to dope sheet, add a new action for the object.
2. Key frame
key frame the animation in the action created.
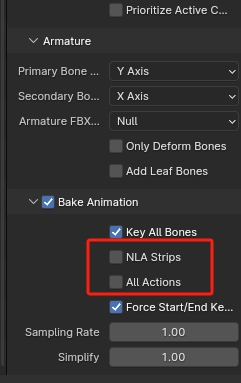
3. Export FBX
Select the object to export, in the export setting, choose the settings as shown. Note to uncheck create leave bones if no rigging is created, and uncheck NLA/all actions, otherwise all actions created for other objects in the scene will be exported together with the object selected.
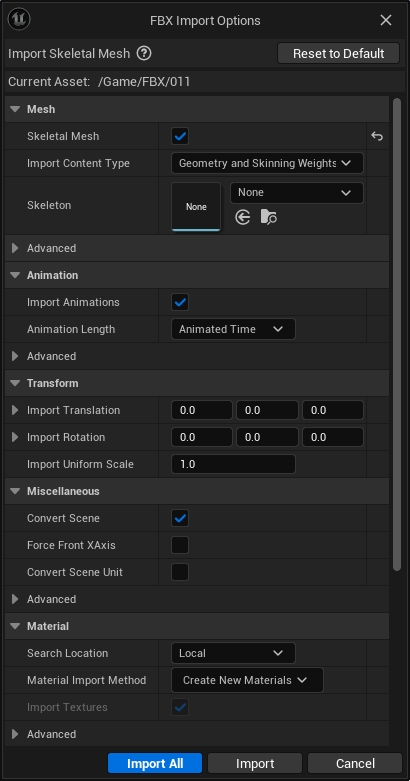
4. Import to UE
Choose import FBX animation in the import setting. Check import skeleton mesh, remember to clear the default mesh to None if any were automatically chosen.
Choose import all and we will get one static mesh, one skeleton mesh and one animation.
5.Animating in UE
Drag the skeleton mesh into the scene. Create a level sequence and add the object to the track. In animation, choose the one that is imported.


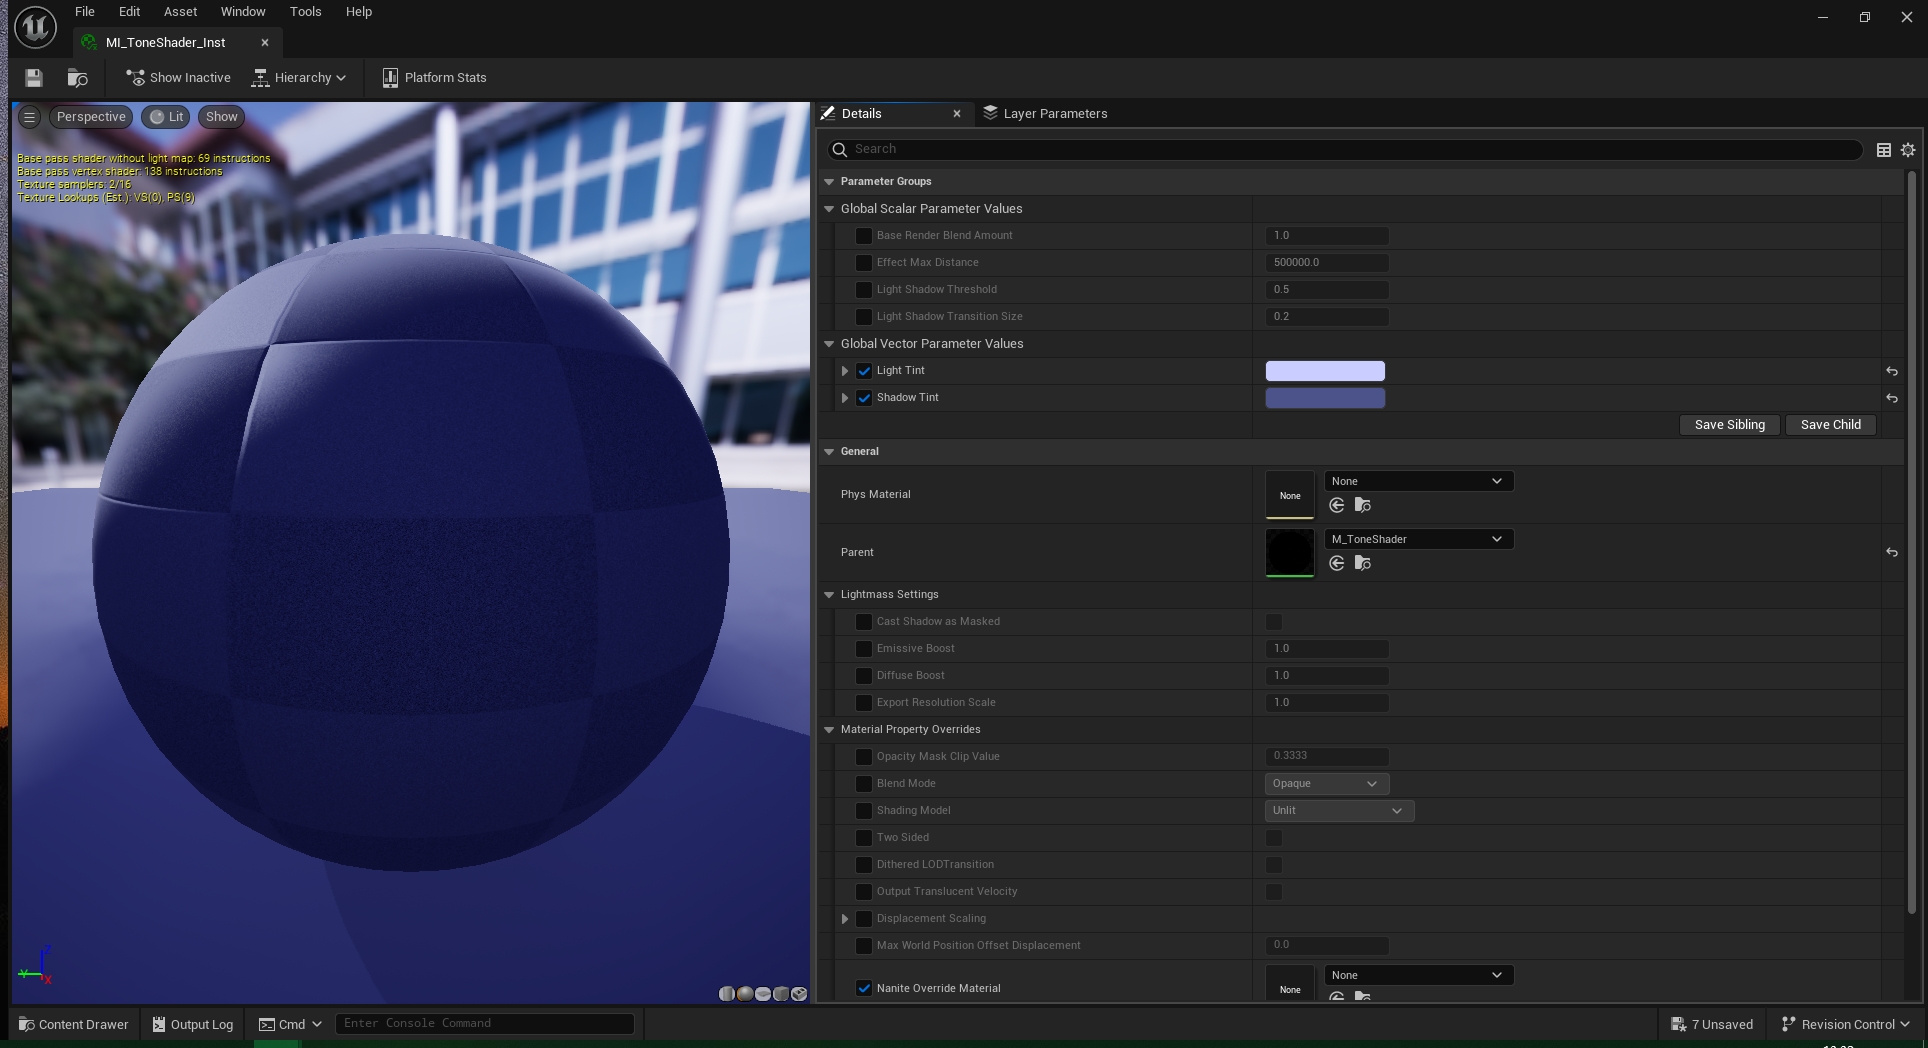
18 Shader
We used two material blueprints to create a sylized shader effect.
The tone shader blueprint is designed for a post-processing material in Unreal Engine, focusing on manipulating light and shadow transitions to create specific visual effects. It extracts light information from the scene and adjusts the appearance of shadows and lighting based on dynamic parameters.
- SceneTexture:PostProcessInput0 and SceneTexture:BaseColor nodes are used to access the scene's post-processing input and base color information
- Desaturation nodes to remove color saturation, focusing on luminance for light and shadow calculations.
- The desaturated outputs are divided by a Divide node to compare their luminance differences to isolate light intensity variations.
- The division result is then saturated through a Saturate node to clamp values between 0 and 1
-
Mask (R) node extracts R channel information
- Light Shadow Param and Light Shadow Transition Size Param allows for dynamic adjustments in the material instance.
The celshader blueprint dynamically adjusts the appearance of highlights, midtones, and shadows based on scene textures and ambient occlusion data
- Using the post process nodes and base color nodes this shader dtermines the threshold based on brightness, and separately applies tint to each of the threshold.
Shader Outcome


Tone Shader


Cel Shader
19 Prototype Preview
In this prototype we have tested out the core technical aspects of our experience.
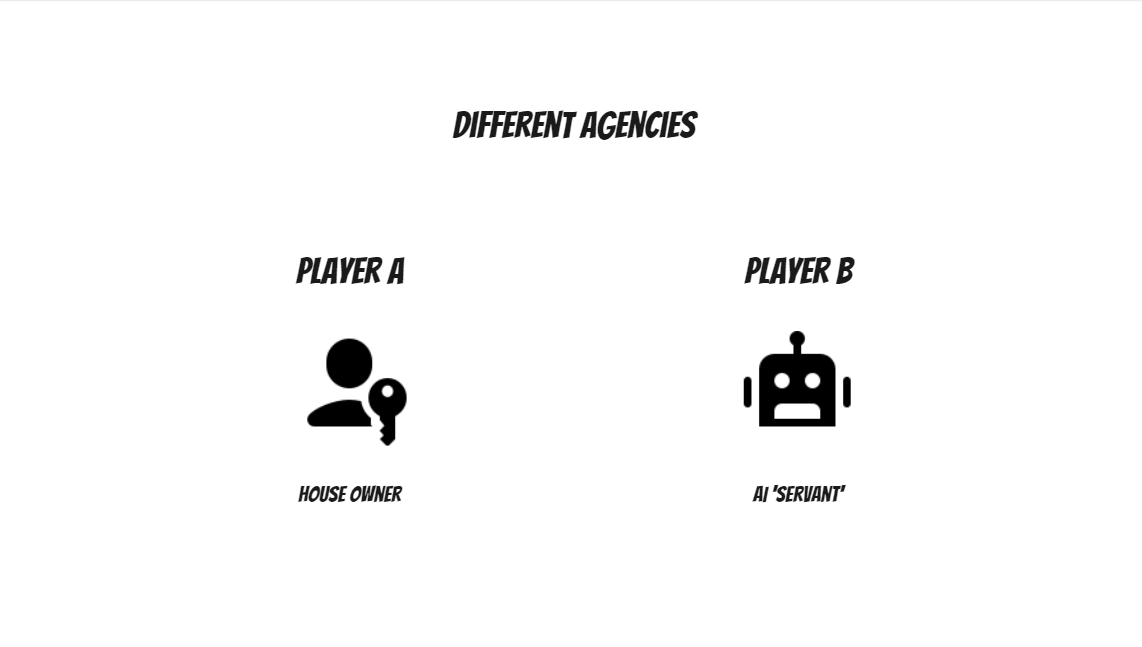
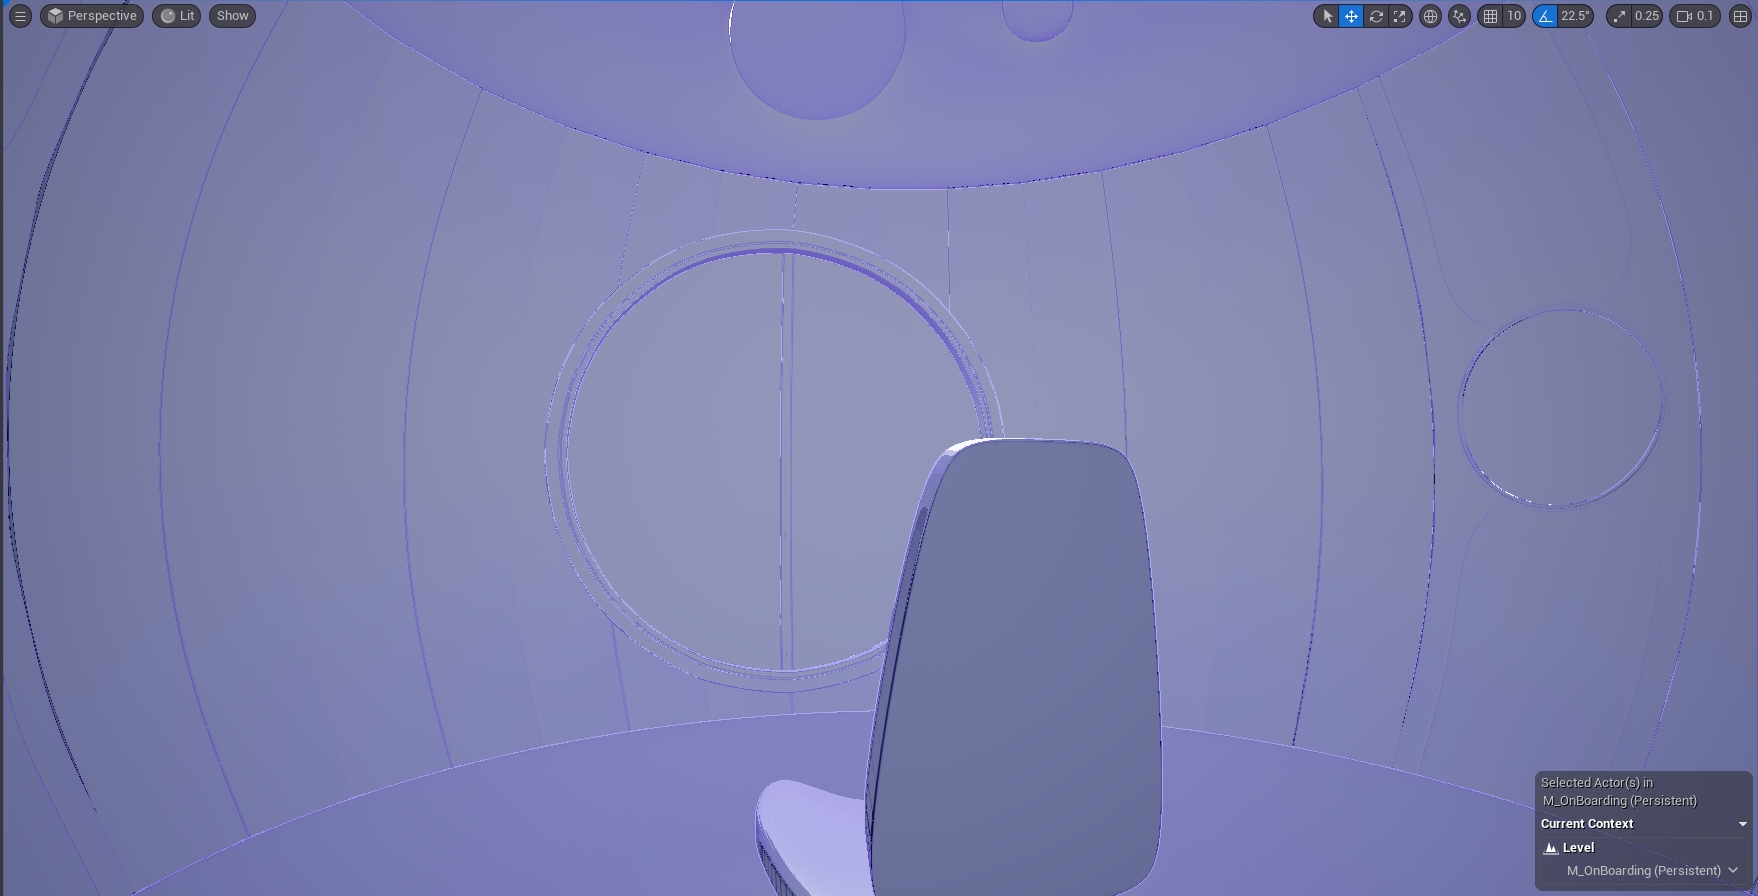
We mainly built up the experience through the lens of Player A who wears a VR headset and sits passively in the middle. The onboarding process gives the player a clue of the rules in the game. The design of the first room-workroom is a prototype of one of the 4 roomthat we are going to design later. We plan to use the onboarding level as the persistent level and build each rooms based on the foundation of the onboarding room, that way we can ensure a smoother and more believable transition between rooms when playing.
Player B’s sides remains less developed. We have managed to let Player B trigger the level streaming and send LED signals through player A’s choice. The physical installation and actual installation however will be more refined in the final design.
We plan to implement the accelerometer module in a pully handle which connects to an hourglass. In the final design, there will be 4 stations of physical artefacts each representing a room for Player A. Player B will need to observe the progress of each hourglass and decide which handle to operate, then teleport Player A to the corresponding room.


20 Reflection
This semester provided us with a comprehensive understanding and hands-on experience in a variety of new tools and methodologies. We have experience in working with HTC Vive last semester, but because of the constrain in hand tracking in Unreal Engine with the headset, we decided to use Oculus Quest this time. This transition marked the start of our exploration into more advanced MR environments.
Our foray into the Oculus Quest ecosystem was characterized by the implementation of several advanced features, such as passthrough capabilities and spatial anchors. Furthermore, the integration of two-player UDP communication protocols facilitated real-time data exchange between participants in the VR environment is also some new feature that we have tested.
Parallel to our VR explorations, we delved into physical computing by experimenting with Arduino modules. This involved the investigation into proper plugins and modules and integrating sensor data from the Arduino into the Unreal Engine. It allowed us to test and refine various concepts of physical interaction within virtual spaces.
A critical takeaway from this semester was the realization of the importance of concept refinement and detailed project planning before starting to work. Our initial experimentation with a wide range of technologies, while fascinating, led to significant time spent on exploring paths that were not ultimately utilized in our final prototype. This highlighted the necessity for more focused concept development and planning, ensuring that further technological explorations align closely with the project.
Collaboration emerged as both a challenge and a learning opportunity. Working closely with my teammate, Lisa, we encountered the complexities of coordinating design and technical development in a dual-player game setting. Initially, the lack of clear role definitions and detailed planning resulted in inefficiencies and overlaps in responsibilities. However, as the project progressed, we identified and capitalized on our individual strengths: my focus shifted towards programming in Arduino and Unreal Engine's Blueprints, while Lisa concentrated on developing the narrative, shaders, and motion capture.
The experience underscored the significance of early-stage planning and a profound understanding of each team member's capabilities. Future projects will benefit from a more strategic approach to role allocation and project management, enabling us to streamline our workflow.
In conclusion, this semester's technical explorations and collaborative efforts have provided great insights for further development. The lessons learned will serve as a solid foundation for next semester.